- Open LH front door
- Lower LH front window
- Open RH front door
- Lower RH front window
- Move RH front seat backward
- Open hood
- Remove rear apron
NOTE:
14x clips
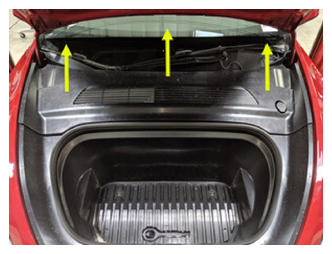 Courtesy of TESLA, INC. Courtesy of TESLA, INC.
|
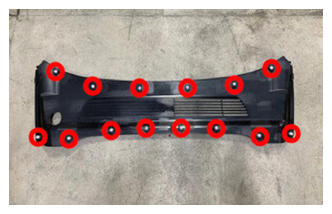 Courtesy of TESLA, INC. Courtesy of TESLA, INC.
|
- Power off vehicle from center display
NOTE:
Via Controls > Safety & Security > Vehicle Power > Power Off
- Disconnect 12V negative terminal and first responders loop
NOTE:
1x nut, 10 mm, 6 N.m, 1x connector, Ensure vehicle is in park, climate control system is off, and vehicle is not charging before disconnecting 12V, Negative terminal should be disconnected before FRL, Allow 2 minutes for all electrical circuits to fully discharge
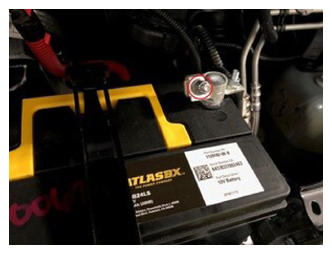 Courtesy of TESLA, INC. Courtesy of TESLA, INC.
|
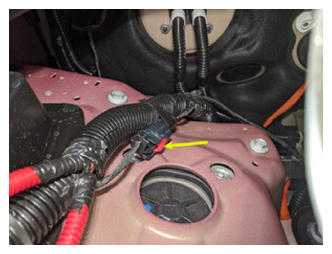 Courtesy of TESLA, INC. Courtesy of TESLA, INC.
|
- Remove fresh air intake duct
NOTE:
1x bolt, 10 mm, 4 N.m, 2x clips, 1x pin, Remove bolt, Gently pry pin out from thermal beam, then remove from bulkhead studs
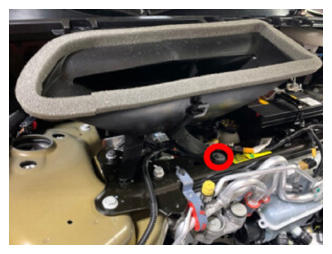 Courtesy of TESLA, INC. Courtesy of TESLA, INC.
|
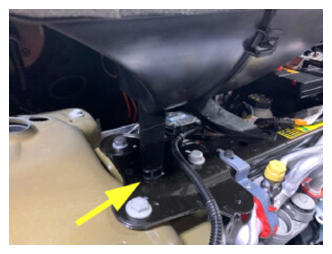 Courtesy of TESLA, INC. Courtesy of TESLA, INC.
|
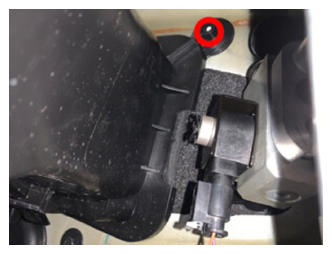 Courtesy of TESLA, INC. Courtesy of TESLA, INC.
|
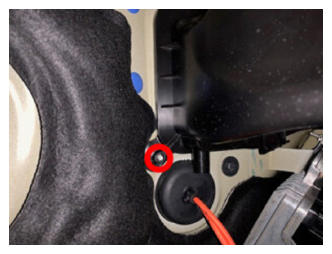 Courtesy of TESLA, INC. Courtesy of TESLA, INC.
|
- Place absorbent material below car computer coolant hose connection points to collect any spilled coolant
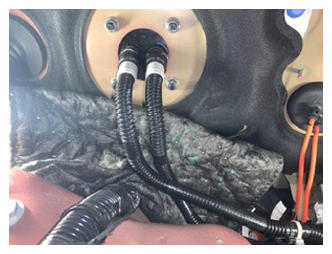 Courtesy of TESLA, INC. Courtesy of TESLA, INC.
|
- Release coolant hoses from car computer
NOTE:
2x spring clips
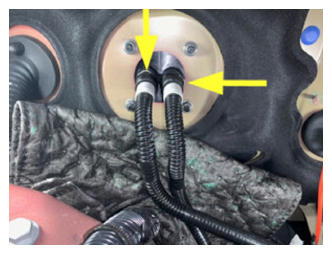 Courtesy of TESLA, INC. Courtesy of TESLA, INC.
|
- Install coolant plugs into coolant outlets of car computer that is being removed from vehicle
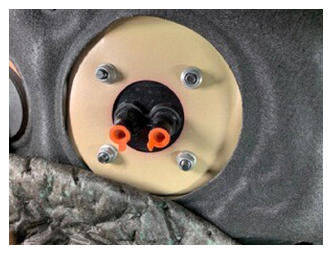 Courtesy of TESLA, INC. Courtesy of TESLA, INC.
|
- Install coolant plugs in hoses
NOTE:
2x plugs, Do not need to engage spring clips
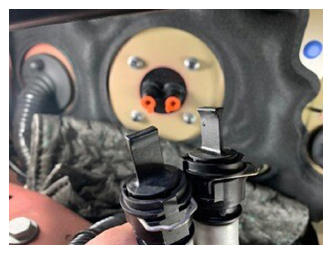 Courtesy of TESLA, INC. Courtesy of TESLA, INC.
|
- Remove nuts securing car computer to bulkhead
NOTE:
5x nyloc nuts, 13 mm, 7.1 N.m, Discard nuts after removal
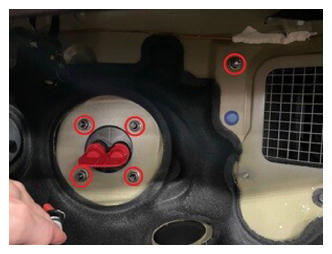 Courtesy of TESLA, INC. Courtesy of TESLA, INC.
|
- Remove LH IP end cap
NOTE:
3x clips
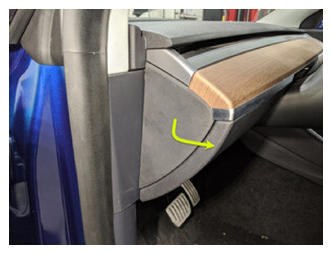 Courtesy of TESLA, INC. Courtesy of TESLA, INC.
|
- Remove LH air wave bezel cap from main decor assembly
NOTE:
2x clips
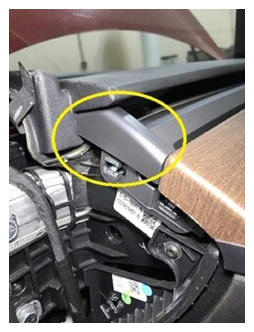 Courtesy of TESLA, INC. Courtesy of TESLA, INC.
|
- Remove RH mid A-pillar assembly
NOTE:
1x clip, 1x tab, Release the upper clip then pull mid A-pillar upward to remove
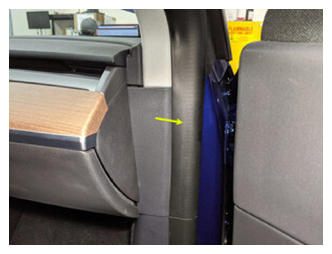 Courtesy of TESLA, INC. Courtesy of TESLA, INC.
|
- Remove RH air wave bezel cap from main decor assembly
NOTE:
2x clips
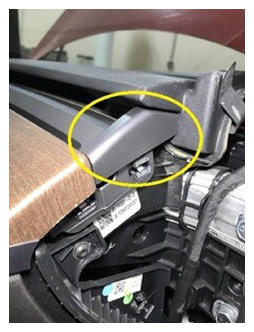 Courtesy of TESLA, INC. Courtesy of TESLA, INC.
|
- Remove main decor assembly
NOTE:
15x clips, 1x center clip, Replace securing clips as needed
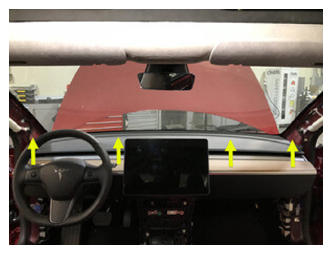 Courtesy of TESLA, INC. Courtesy of TESLA, INC.
|
- Remove clips securing RH footwell assembly
NOTE:
4x push clips
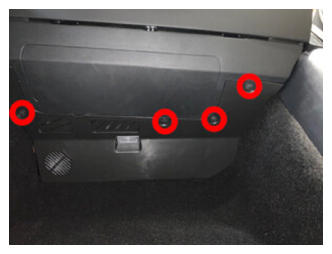 Courtesy of TESLA, INC. Courtesy of TESLA, INC.
|
- Disconnect RH footwell assembly connectors and remove from vehicle
NOTE:
2x connectors
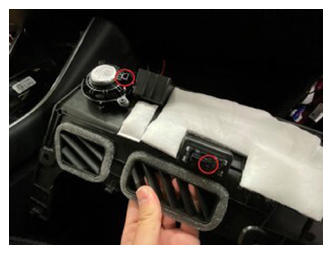 Courtesy of TESLA, INC. Courtesy of TESLA, INC.
|
- Remove fasteners securing passenger knee air bag to vehicle
NOTE:
2x screws, T20, 2 N.m, 1x push clip, 4x patch bolts, E10, 8 N.m, Discard patch bolts after removal, Support the knee air bag while lowering, The connector/harness length is very short
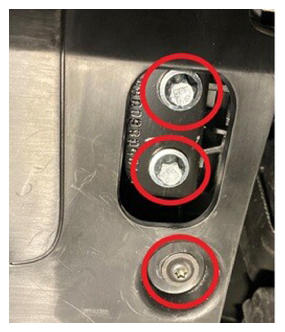 Courtesy of TESLA, INC. Courtesy of TESLA, INC.
|
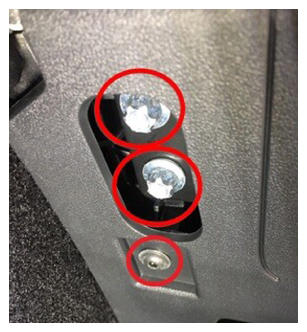 Courtesy of TESLA, INC. Courtesy of TESLA, INC.
|
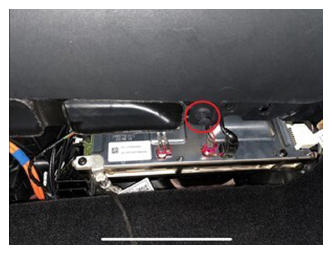 Courtesy of TESLA, INC. Courtesy of TESLA, INC.
|
- Remove the passenger knee air bag from vehicle
NOTE:
1x connector, Release locking tab
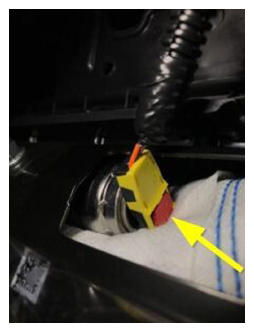 Courtesy of TESLA, INC. Courtesy of TESLA, INC.
|
- Disconnect glove box USB cable from car computer
NOTE:
1x connector, Depress latch on top of USB cable to release internal latches, then release from car computer
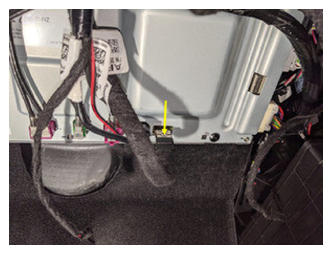 Courtesy of TESLA, INC. Courtesy of TESLA, INC.
|
- Remove screws securing glove box assembly to IP carrier
NOTE:
6x screws, T20, 2.3 N.m
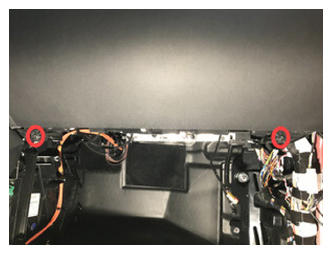 Courtesy of TESLA, INC. Courtesy of TESLA, INC.
|
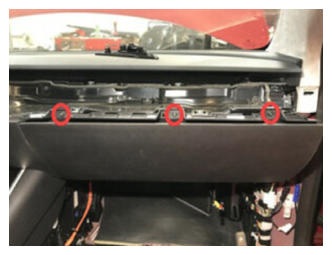 Courtesy of TESLA, INC. Courtesy of TESLA, INC.
|
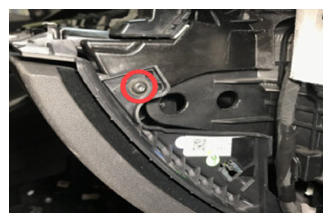 Courtesy of TESLA, INC. Courtesy of TESLA, INC.
|
- Remove the glove box from IP carrier
NOTE:
3x clips
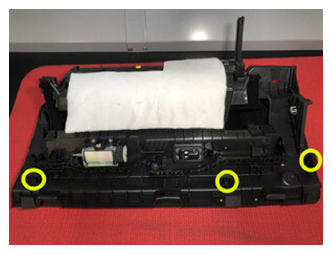 Courtesy of TESLA, INC. Courtesy of TESLA, INC.
|
- Disconnect glove box assembly connectors
NOTE:
3x connectors
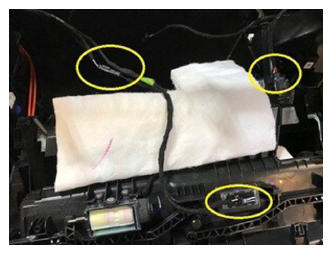 Courtesy of TESLA, INC. Courtesy of TESLA, INC.
|
- Remove the passenger footwell air duct
NOTE:
1x push clip
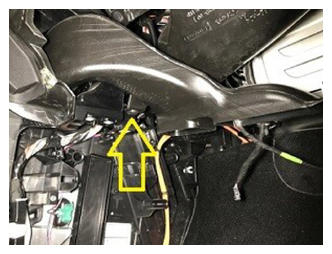 Courtesy of TESLA, INC. Courtesy of TESLA, INC.
|
- Remove the RH IP air wave duct
NOTE:
2x push clips
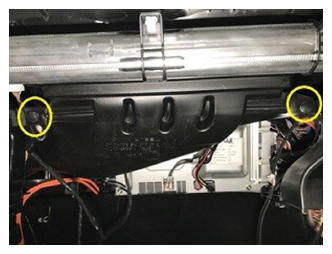 Courtesy of TESLA, INC. Courtesy of TESLA, INC.
|
- Release ground strap from car computer
NOTE:
1x bolt, T25, 1x nut, 8 mm, 3.5 N.m, Nut located on backside, Discard nut after removal
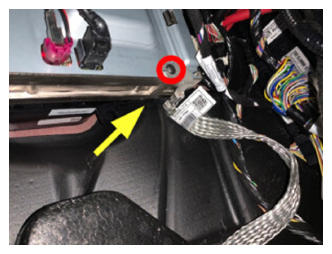 Courtesy of TESLA, INC. Courtesy of TESLA, INC.
|
- Disconnect connectors on front side of car computer
NOTE:
3x connectors, If equipped, release locking tab, then remove connector body
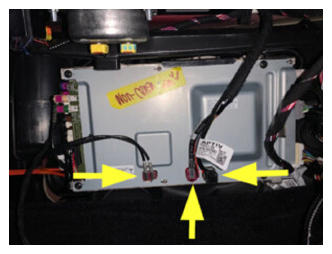 Courtesy of TESLA, INC. Courtesy of TESLA, INC.
|
- Release harness guide clip
NOTE:
1x clip, Pinch release tabs with needle nose pliers
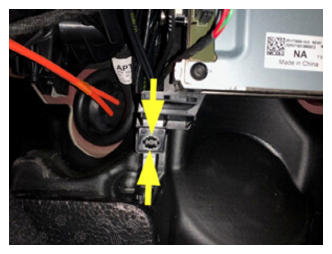 Courtesy of TESLA, INC. Courtesy of TESLA, INC.
|
- Slide car computer inward to allow access to connectors and harness clips
NOTE:
Be careful not to strain harness and connectors
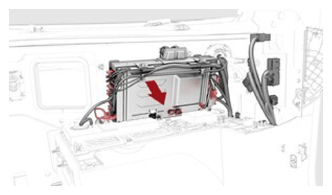 Courtesy of TESLA, INC. Courtesy of TESLA, INC.
|
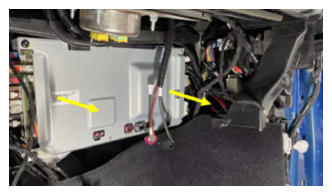 Courtesy of TESLA, INC. Courtesy of TESLA, INC.
|
- Remove car computer shroud
NOTE:
4x clips
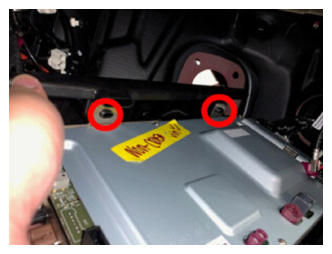 Courtesy of TESLA, INC. Courtesy of TESLA, INC.
|
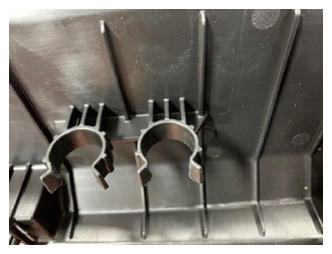 Courtesy of TESLA, INC. Courtesy of TESLA, INC.
|
- Release harness clips from top of car computer
NOTE:
2x clips
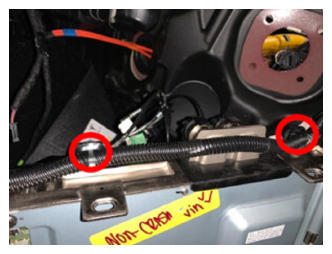 Courtesy of TESLA, INC. Courtesy of TESLA, INC.
|
- Remove fasteners securing car computer cover to car computer body
NOTE:
3x bolts, T25, 3x nuts, 8 mm, 3.5 N.m, Discard nyloc nuts after removal
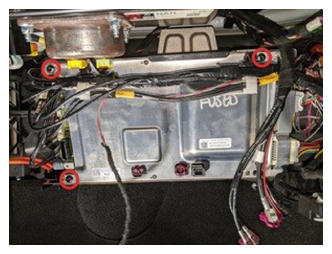 Courtesy of TESLA, INC. Courtesy of TESLA, INC.
|
- Remove the top cover fasteners
NOTE:
4x screws, T10, 1.4 N.m, Discard after removal
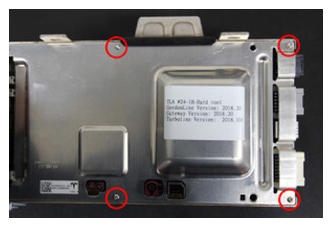 Courtesy of TESLA, INC. Courtesy of TESLA, INC.
|
- Remove the connectivity board mounting screws
NOTE:
5x screws, T10, 0.7 N.m, Discard after removal
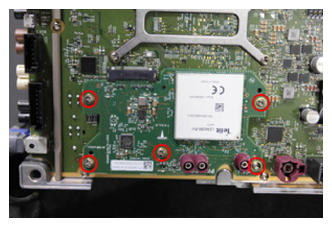 Courtesy of TESLA, INC. Courtesy of TESLA, INC.
|
- Slide the connectivity board down to separate connector and remove
NOTE:
1x connector
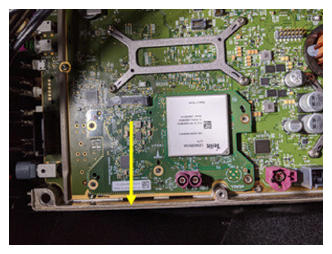 Courtesy of TESLA, INC. Courtesy of TESLA, INC.
|
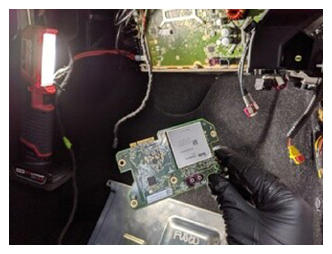 Courtesy of TESLA, INC. Courtesy of TESLA, INC.
|
- Slide the connectivity board in to the PCB connector
NOTE:
1x connector
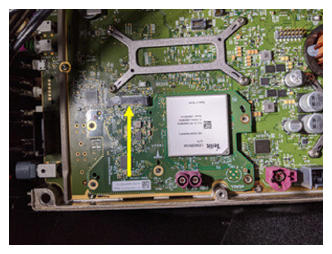 Courtesy of TESLA, INC. Courtesy of TESLA, INC.
|
- Install mounting screws to secure connectivity board
NOTE:
5x screws, T10, 0.7 N.m, Install new fasteners
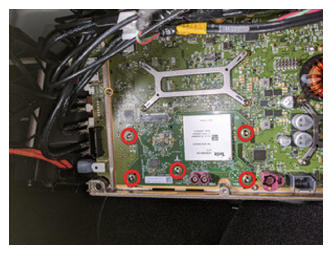 Courtesy of TESLA, INC. Courtesy of TESLA, INC.
|
- Slide top cover onto car computer assembly
NOTE:
Top cover must be underneath top gasket seal
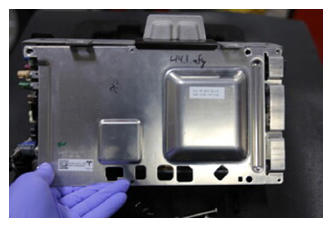 Courtesy of TESLA, INC. Courtesy of TESLA, INC.
|
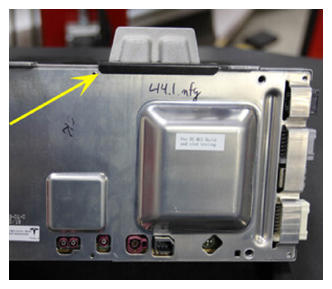 Courtesy of TESLA, INC. Courtesy of TESLA, INC.
|
- Install top cover mounting screws
NOTE:
4x screws, T10, 1.4 N.m, Install new screws
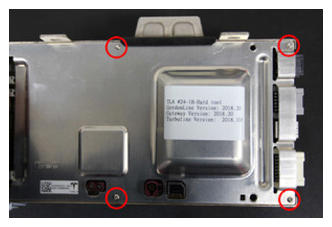 Courtesy of TESLA, INC. Courtesy of TESLA, INC.
|
- Install fasteners securing car computer covers to car computer body bracket
NOTE:
3x bolts, T25, 3x nuts, 8 mm, 3.5 N.m, Install new nyloc nuts
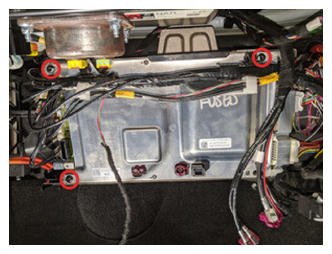 Courtesy of TESLA, INC. Courtesy of TESLA, INC.
|
- Secure harness to top of car computer
NOTE:
2x clips
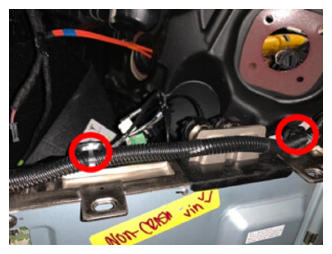 Courtesy of TESLA, INC. Courtesy of TESLA, INC.
|
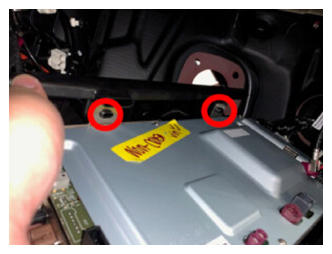
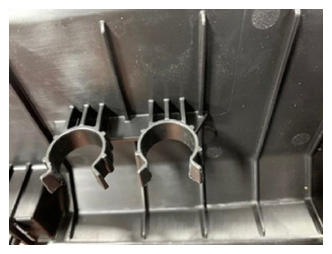
- Install car computer shroud onto car computer
NOTE:
4x clips
 Courtesy of TESLA, INC. Courtesy of TESLA, INC.
|
 Courtesy of TESLA, INC. Courtesy of TESLA, INC.
|
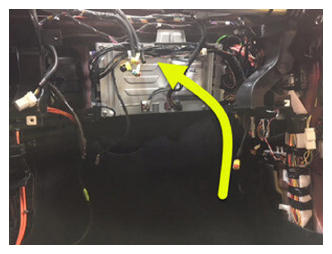
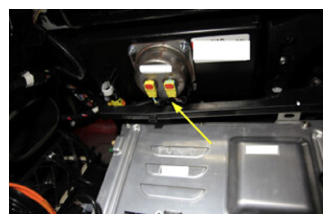
- Slide car computer into position on bulkhead
NOTE:
Use caution during installation due to minimal clearance between shroud and passenger airbag connectors and harness
 Courtesy of TESLA, INC. Courtesy of TESLA, INC.
|
 Courtesy of TESLA, INC. Courtesy of TESLA, INC.
|
- Secure harness guide clip
NOTE:
1x clip
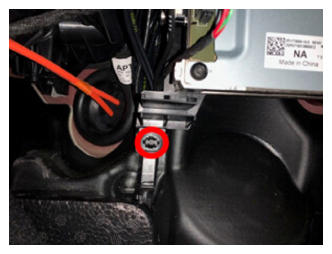 Courtesy of TESLA, INC. Courtesy of TESLA, INC.
|
- Connect connectors on the front side of car computer
NOTE:
3x connectors, If equipped, fully seat connector, then engage locking tab
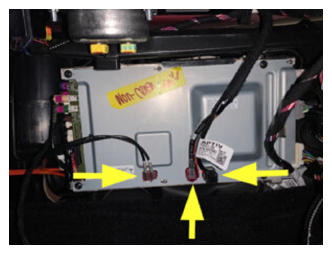 Courtesy of TESLA, INC. Courtesy of TESLA, INC.
|
- Secure ground cable to car computer
NOTE:
1x bolt, T25, 1x nut, 8 mm, 3.5 N.m, Install new nyloc nut
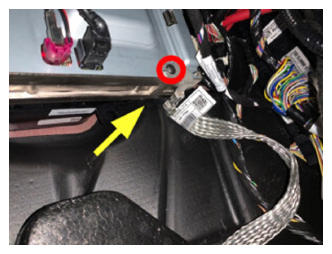 Courtesy of TESLA, INC. Courtesy of TESLA, INC.
|
- Install nuts securing car computer to the bulkhead
NOTE:
5x nyloc nuts, 13 mm, 7.1 N.m, Install new nyloc nuts
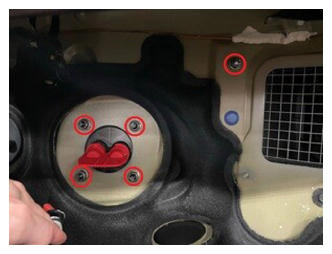 Courtesy of TESLA, INC. Courtesy of TESLA, INC.
|
- Verify there are no coolant plugs in the car computer coolant necks
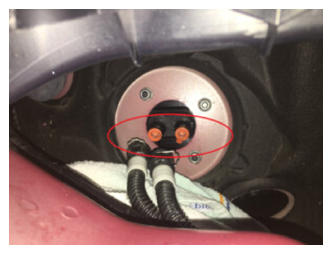 Courtesy of TESLA, INC. Courtesy of TESLA, INC.
|
- Remove plugs from hoses
NOTE:
2x plugs, Engage spring clips after removal
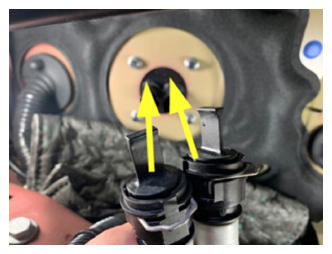 Courtesy of TESLA, INC. Courtesy of TESLA, INC.
|
- Secure hoses to car computer coolant inlet/outlet
NOTE:
2x spring clips, Perform push-pull-push test to ensure the hoses are fully seated
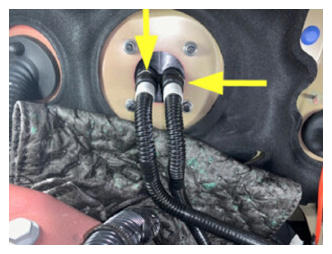 Courtesy of TESLA, INC. Courtesy of TESLA, INC.
|
- Remove coolant bottle cap
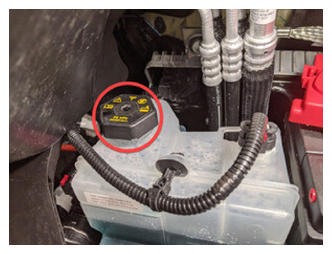 Courtesy of TESLA, INC. Courtesy of TESLA, INC.
|
- Fill coolant bottle to base of neck as indicated
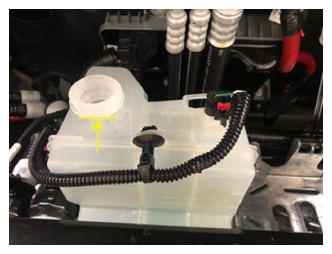 Courtesy of TESLA, INC. Courtesy of TESLA, INC.
|
- Remove absorbent material from below car computer coolant hose connection points
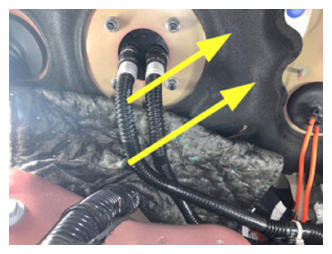 Courtesy of TESLA, INC. Courtesy of TESLA, INC.
|
- Install the RH IP air wave duct
NOTE:
2x push clips
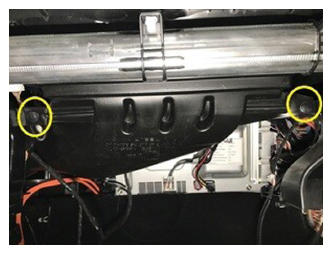 Courtesy of TESLA, INC. Courtesy of TESLA, INC.
|
- Install the passenger footwell air duct
NOTE:
1x push clip
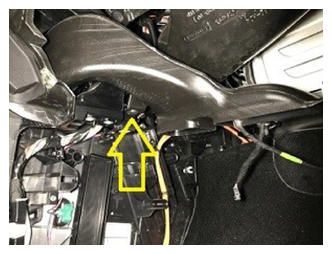 Courtesy of TESLA, INC. Courtesy of TESLA, INC.
|
- Connect glove box assembly connectors
NOTE:
3x connectors, New puddle lamp harness routing prevent blocking movement of pawls
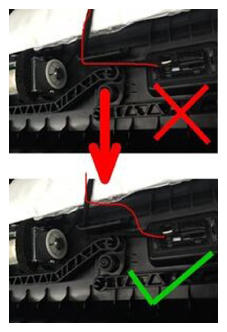 Courtesy of TESLA, INC. Courtesy of TESLA, INC.
|
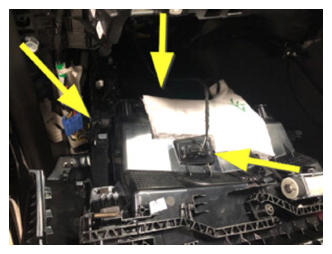 Courtesy of TESLA, INC. Courtesy of TESLA, INC.
|
- Install the glove box into IP carrier
NOTE:
3x clips
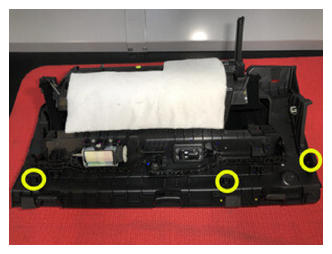 Courtesy of TESLA, INC. Courtesy of TESLA, INC.
|
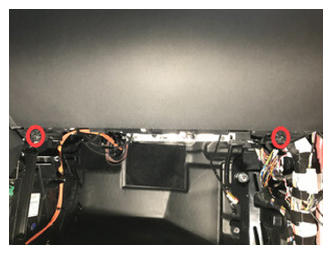
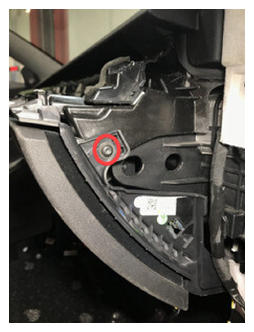
- Install screws securing glove box assembly to IP carrier
NOTE:
6x screws, T20, 2.3 N.m
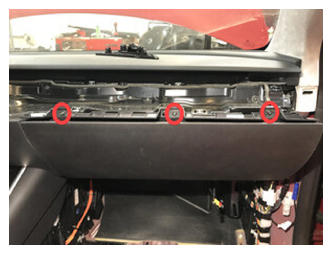 Courtesy of TESLA, INC. Courtesy of TESLA, INC.
|
 Courtesy of TESLA, INC. Courtesy of TESLA, INC.
|
 Courtesy of TESLA, INC. Courtesy of TESLA, INC.
|
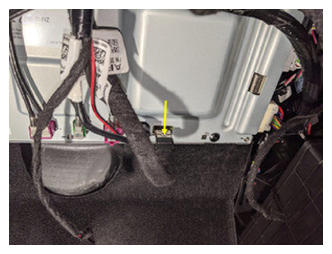
- Connect glove box USB cable to car computer
NOTE:
1x connector
 Courtesy of TESLA, INC. Courtesy of TESLA, INC.
|
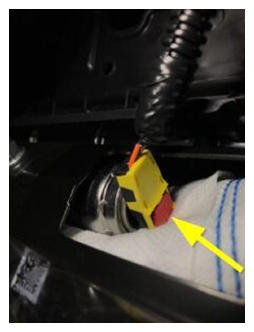
- Install the passenger knee air bag into vehicle
NOTE:
1x connector, Engage locking tab, Use caution not to damage the connector/harness, Support the knee air bag while connecting the connector
 Courtesy of TESLA, INC. Courtesy of TESLA, INC.
|
- Install fasteners securing passenger knee air bag to vehicle
NOTE:
4x patch bolts, E10, 8 N.m, 2x screws, T20, 2 N.m, 1x push clip, Install new patch bolts
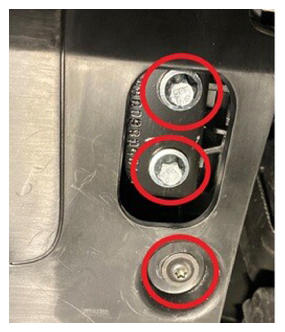 Courtesy of TESLA, INC. Courtesy of TESLA, INC.
|
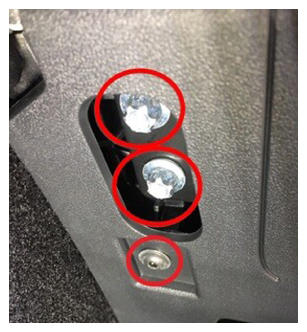 Courtesy of TESLA, INC. Courtesy of TESLA, INC.
|
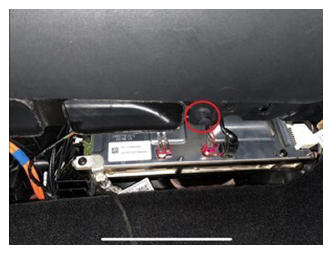 Courtesy of TESLA, INC. Courtesy of TESLA, INC.
|
- Connect the RH footwell assembly connectors
NOTE:
2x connectors
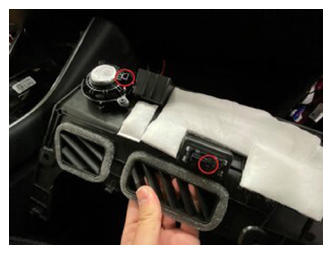 Courtesy of TESLA, INC. Courtesy of TESLA, INC.
|
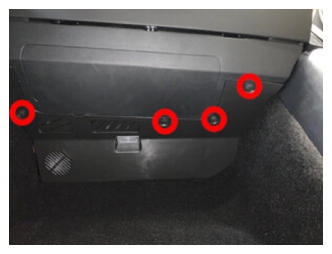
- Install clips securing RH footwell assembly
NOTE:
4x push clips
 Courtesy of TESLA, INC. Courtesy of TESLA, INC.
|
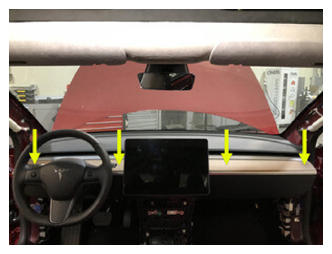
- Install main decor assembly
NOTE:
15x clips, 1x center clip
 Courtesy of TESLA, INC. Courtesy of TESLA, INC.
|
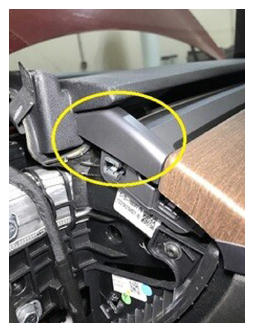
- Install LH air wave bezel cap to main decor assembly
NOTE:
2x clips
 Courtesy of TESLA, INC. Courtesy of TESLA, INC.
|
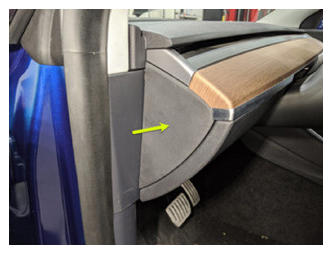
- Install LH IP end cap
NOTE:
3x clips
 Courtesy of TESLA, INC. Courtesy of TESLA, INC.
|
- Install RH air wave bezel cap to main decor assembly
NOTE:
2x clips
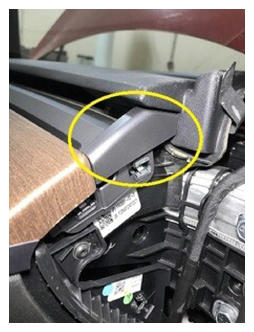 Courtesy of TESLA, INC. Courtesy of TESLA, INC.
|
- Install RH IP end cap
NOTE:
3x clips
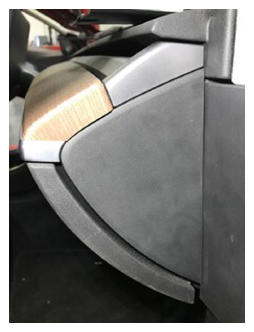 Courtesy of TESLA, INC. Courtesy of TESLA, INC.
|
- Connect first responder loop and 12V negative terminal
NOTE:
1x nut, 10 mm, 6 N.m, 1x connector, Engage locking tab, Connect FRL first before connecting 12V to avoid damage to car computer
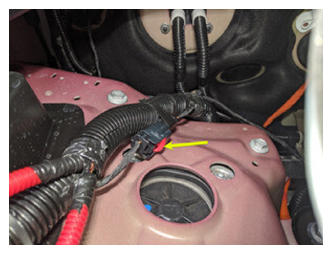 Courtesy of TESLA, INC. Courtesy of TESLA, INC.
|
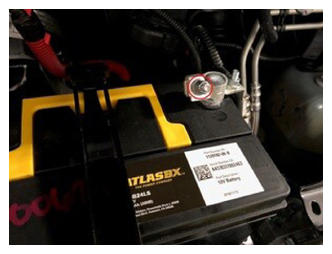 Courtesy of TESLA, INC. Courtesy of TESLA, INC.
|
- Connect to vehicle using Toolbox 3.0
- Select 'TEST_VCFRONT_X_THERMAL-COOLANT-AIR-PURGE ', click 'Run', and allow routine to complete
NOTE:
Make sure vehicle is not in drive state, Plan is still running despite the stop message, Coolant pumps will be audible, Test lasts approximately 10 mins, Idle speed = ~1500 RPM, Test will vary speeds from 3500-6500 RPM and actuate valve between SERIES and PARALLEL, Putting vehicle into drive state will stop this routine, If speeds hover at 7000 RPM, that means the pumps are air locked, perform vacuum fill again, Continue to add coolant and purge until the coolant level reaches between the NOM and MAX Lines on the bottle, Select 'X' at top right of window to close once complete
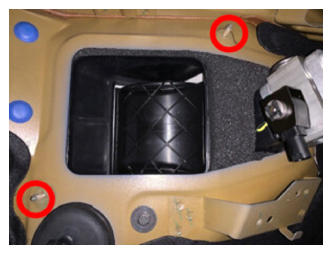
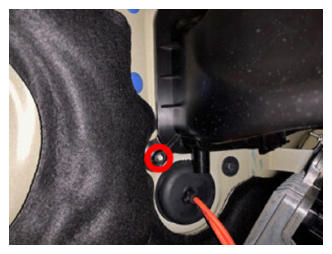
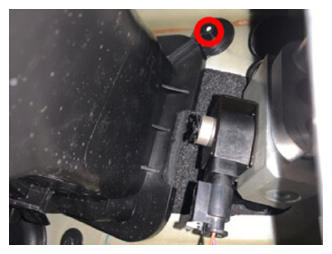
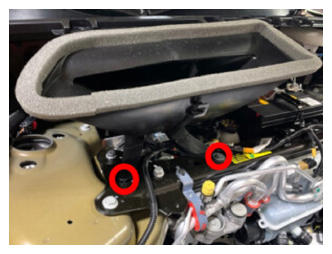
- Install fresh air intake duct
NOTE:
1x bolt, 10 mm bolt, 4 N.m, 2x clips, 1x pin, Set clips on bulkhead studs, Secure to thermal bar
 Courtesy of TESLA, INC. Courtesy of TESLA, INC.
|
 Courtesy of TESLA, INC. Courtesy of TESLA, INC.
|
 Courtesy of TESLA, INC. Courtesy of TESLA, INC.
|
 Courtesy of TESLA, INC. Courtesy of TESLA, INC.
|
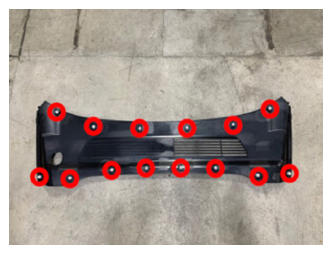
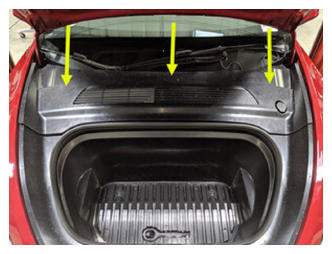
- Install rear apron
NOTE:
14x clips, Hold rear wall of frunk to keep from flexing while engaging front clips
 Courtesy of TESLA, INC. Courtesy of TESLA, INC.
|
 Courtesy of TESLA, INC. Courtesy of TESLA, INC.
|
- Close hood
- Move RH front seat to original position
- Raise RH front window
- Close RH front door
- Raise LH front window
- Close LH front door