- Open all doors and lower the windows.
- Prepare the LH seat assembly for removal later in this procedure. See Seat Assembly - 1st Row - LH - Remove and Install
, steps 1 through 8
- Repeat the previous step for the RH seat assembly.
- Recover the refrigerant. See A/C Refrigerant Recovery And Recharge - Remove And Replace
.
- Enable tow mode through the touchscreen.
- Disconnect 12V power. See Disconnect 12V Power .
- Remove the cowl screen panel. See Panel - Cowl Screen (Remove And Replace)
.
- Remove the wiper motor. See WIPER MOTOR ASSEMBLY (REMOVE AND REPLACE) .
- Remove the LH shock tower brace. See Shock Tower Brace - LH (Remove And Replace)
.
- Remove the RH shock tower brace.
- Remove the screws (x2) that attach the air suspension reservoir to the brackets, and then remove the brackets from the vehicle.
 Courtesy of TESLA, INC. Courtesy of TESLA, INC.
|
- Maneuver the air suspension reservoir below the AC line and then set the reservoir aside for access.
 Courtesy of TESLA, INC. Courtesy of TESLA, INC.
|
- Remove the bolts (x2) that attach the TXV to the evaporator.
NOTE:
Discard o-rings and replace during installation.
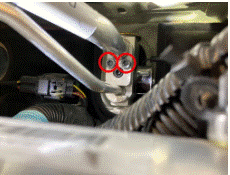 Courtesy of TESLA, INC. Courtesy of TESLA, INC.
|
- Disconnect the A/C lines and the TXV from the HVAC unit.
NOTE:
Gently pull the lines away from the bulkhead/HVAC box. Make sure to retain the O-rings at the TXV.
 Courtesy of TESLA, INC. Courtesy of TESLA, INC.
|
- Disconnect the LH seat harness connectors (x3), and then remove the LH seat from the vehicle.
- Disconnect the RH seat harness connectors (x2), and then remove the RH seat from the vehicle.
- Remove the center console. See Center Console Assembly (Remove And Replace)
.
- Remove the instrument panel top pad assembly. See Assembly - Top Pad - Instrument Panel - Remove And Install
.
- Remove the RH instrument panel finisher assembly. See Assembly - Finisher - Instrument Panel - RH - Remove And Replace
.
- Remove the instrument cluster frame assembly. See Assembly - Frame - Instrument Cluster - Remove And Replace
.
- Remove the LH inner instrument panel finisher assembly with vent. See Face Level Vent - Driver's - Inner - Remove And Replace
.
- Remove the LH instrument panel outer finisher assembly. See Assembly - Finisher - Instrument Panel - LH - Remove And Replace
.
- Remove the steering column. See Steering Column - Remove And Replace
.
- Remove the instrument cluster. See Instrument Cluster - Remove And Replace
.
- Remove the media control unit. See Media Control Unit - Remove And Install
.
- Remove the IP carrier. See IP Carrier - Remove And Replace
.
- Disconnect the headliner harness connectors (x3) at the LH A-pillar and release the harness from the vehicle.
 Courtesy of TESLA, INC. Courtesy of TESLA, INC.
|
- Remove the cross car beam harness connectors (x7) at the LH lower A-pillar.
NOTE:
Only release connectors that run to the harness on the cross car beam.
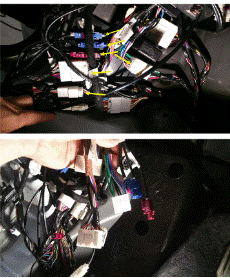 Courtesy of TESLA, INC. Courtesy of TESLA, INC.
|
 Courtesy of TESLA, INC. Courtesy of TESLA, INC.
|
- Disconnect the cross car beam harness connectors (x7) at the RH lower A-pillar.
NOTE:
Only release connectors that run to the harness on the cross car beam.
 Courtesy of TESLA, INC. Courtesy of TESLA, INC.
|
 Courtesy of TESLA, INC. Courtesy of TESLA, INC.
|
- Remove the cross car beam. See Cross Car Beam (Remove And Replace)
.
 Courtesy of TESLA, INC. Courtesy of TESLA, INC.
|
 Courtesy of TESLA, INC. Courtesy of TESLA, INC.
|
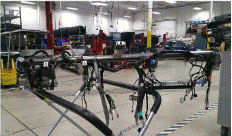 Courtesy of TESLA, INC. Courtesy of TESLA, INC.
|
- Remove the LH and RH lower B-pillar trim. See Trim - B-Pillar - Lower - LH - Remove And Install
.
- Remove 2nd row cushion seat base frame. See Frame - Seat Base - 2nd Row Cushion - Remove And Replace
.
- Remove the main carpet from the vehicle. See Carpet - Interior Complete - Remove And Replace
.
- Remove the HVAC assembly. See HVAC Assembly - Remove And Replace
.
- Remove the connectors (x3) connecting the lower dash harness to the front trunk harness.
 Courtesy of TESLA, INC. Courtesy of TESLA, INC.
|
- Disconnect adaptive air suspension ECU connectors (x3).
 Courtesy of TESLA, INC. Courtesy of TESLA, INC.
|
- Lift up the harness connectors, and then remove the air suspension ECU from the vehicle.
 Courtesy of TESLA, INC. Courtesy of TESLA, INC.
|
- Disconnect the harness connectors (x3) from the connector carrier at the lower RH A-pillar.
 Courtesy of TESLA, INC. Courtesy of TESLA, INC.
|
 Courtesy of TESLA, INC. Courtesy of TESLA, INC.
|
- Remove the female side connectors (x4) from the RH A-pillar connector carrier bracket.
NOTE:
Use the flat head screw driver to carefully lift-up the locking tab securing the female side connector in the carrier connector bracket.
 Courtesy of TESLA, INC. Courtesy of TESLA, INC.
|
 Courtesy of TESLA, INC. Courtesy of TESLA, INC.
|
- Disconnect the front trunk harness from the in-cabin fuse box.
 Courtesy of TESLA, INC. Courtesy of TESLA, INC.
|
- Remove the front trunk harness ground connection from the in-cabin fuse box.
 Courtesy of TESLA, INC. Courtesy of TESLA, INC.
|
- Release the front trunk harness barrel clips (x2) from the studs on the bulkhead.
NOTE:
2x barrel clips
 Courtesy of TESLA, INC. Courtesy of TESLA, INC.
|
- Push the front trunk harness grommet through the bulkhead and feed out harness into the front of the vehicle.
 Courtesy of TESLA, INC. Courtesy of TESLA, INC.
|
 Courtesy of TESLA, INC. Courtesy of TESLA, INC.
|
- Disconnect the main harness connector from the RH A-pillar cabin fuse box.
NOTE:
Only remove the single connector that leads to the main front trunk harness.
 Courtesy of TESLA, INC. Courtesy of TESLA, INC.
|
- Prepare the vehicle for lifting, but do not raise it at this time. See Raise Vehicle - 2 Post Lift
.
NOTE:
Make sure to enable "Jack Mode" before lifting the vehicle.
- Remove the LH and RH front wheels. See Wheel - Remove And Install
.
- Remove the nut and clips (x5) that attach the rear half of the RH front wheelhouse liner to the body.
 Courtesy of TESLA, INC. Courtesy of TESLA, INC.
|
 Courtesy of TESLA, INC. Courtesy of TESLA, INC.
|
- Fold over the RH front wheelhouse liner and put it in between the brake rotor and the front fascia.
 Courtesy of TESLA, INC. Courtesy of TESLA, INC.
|
- Disconnect the RH side repeater camera connectors (x2).
 Courtesy of TESLA, INC. Courtesy of TESLA, INC.
|
- Remove the nut and clips (x5) that attach the rear half of LH front wheelhouse liner to the body.
 Courtesy of TESLA, INC. Courtesy of TESLA, INC.
|
 Courtesy of TESLA, INC. Courtesy of TESLA, INC.
|
 Courtesy of TESLA, INC. Courtesy of TESLA, INC.
|
- Fold over the LH front wheelhouse liner and put it in between the brake rotor and the front fascia.
 Courtesy of TESLA, INC. Courtesy of TESLA, INC.
|
- Disconnect the connector from the front trunk harness to the hood harness.
 Courtesy of TESLA, INC. Courtesy of TESLA, INC.
|
- Remove the windshield washer reservoir. See Reservoir - Windshield Washer - Remove And Replace .
- Disconnect the LH side repeater camera connectors (x2).
 Courtesy of TESLA, INC. Courtesy of TESLA, INC.
|
- Pass the harness through the opening behind the RH shock tower for harness removal.
NOTE:
Pass the harness under the HV cables and over the top of the brake master cylinder following the pathway of the larger section of the front trunk harness along the bulkhead.
 Courtesy of TESLA, INC. Courtesy of TESLA, INC.
|
- Remove the mid aero shield panel. See Panel - Aero Shield - Mid (Remove And Replace)
- Remove the HV battery. See HV Battery (RWD/AWD) - Remove And Install
.
- Remove all items from pockets and ensure that you do not wear any metal items.
- Put on HV insulating gloves and leather over gloves.
- Verify that there is no high voltage present at the HV rapid mate.
NOTE:
Measure B+ to Ground, B- to Ground, B+ to B-. If voltage is greater than 10V, pack contactors are not open or welded. Stop work and reach out to Service Engineering.
 Courtesy of TESLA, INC. Courtesy of TESLA, INC.
|
- Install HV and LV Rapid Mate covers.
 Courtesy of TESLA, INC. Courtesy of TESLA, INC.
|
- Remove HV insulating gloves.
- Remove the front aero shield panel. See Panel - Aero Shield - Front - Remove And Replace
.
- Disconnect the RH fan control module connector.
NOTE:
The module is located on the outer side of the RH body beam and can be accessed from underneath the vehicle with the front aero shield removed.
 Courtesy of TESLA, INC. Courtesy of TESLA, INC.
|
- Disconnect the coolant 3-way valve at the RH front lower corner of the front subframe.
 Courtesy of TESLA, INC. Courtesy of TESLA, INC.
|
- Pass the leg of the harness with the fan control module coolant 3-way valve connectors up, above the RH body rail, for harness removal.
 Courtesy of TESLA, INC. Courtesy of TESLA, INC.
|
- Disconnect the LH fan control module.
NOTE:
The module is located on the outer side of the LH body beam and can be accessed from underneath the vehicle with the front aero shield removed.
 Courtesy of TESLA, INC. Courtesy of TESLA, INC.
|
- Pass the leg of the harness with the fan control module connector up, above the LH body rail, for harness removal.
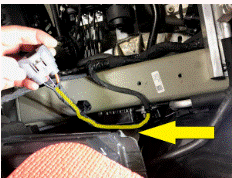 Courtesy of TESLA, INC. Courtesy of TESLA, INC.
|
- Disconnect the battery coolant pump 1 connector.
 Courtesy of TESLA, INC. Courtesy of TESLA, INC.
|
- Release the front trunk harness clips (x3) for the leg of the harness that runs to battery coolant pump 1.
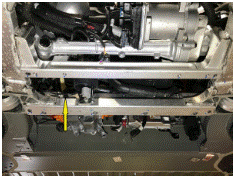 Courtesy of TESLA, INC. Courtesy of TESLA, INC.
|
 Courtesy of TESLA, INC. Courtesy of TESLA, INC.
|
- Remove the bolt that attaches the 12V positive terminal to the bottom of the DCDC.
 Courtesy of TESLA, INC. Courtesy of TESLA, INC.
|
- Remove the bolts (x4) that attach the FJB to rapid splitter HV harness.
 Courtesy of TESLA, INC. Courtesy of TESLA, INC.
|
- Release the 2 HV cables from the FJB.
 Courtesy of TESLA, INC. Courtesy of TESLA, INC.
|
- Release the HV harness clip at the bulkhead.
NOTE:
This allows the HV harness to be moved out of the way for the front trunk harness to pass behind it during removal.
 Courtesy of TESLA, INC. Courtesy of TESLA, INC.
|
- Remove the bolts (x2) that attach the bottom of front junction box to the vehicle.
 Courtesy of TESLA, INC. Courtesy of TESLA, INC.
|
- Disconnect the logic connector from the front junction box.
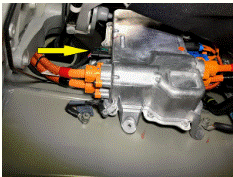 Courtesy of TESLA, INC. Courtesy of TESLA, INC.
|
- Remove the nut that attaches the RH side of front junction box to the vehicle.
 Courtesy of TESLA, INC. Courtesy of TESLA, INC.
|
- Pass the logic connector by the HV cables up the bulkhead into the cavity near the RH shock tower for harness removal.
NOTE:
Tilt the front junction box away from the bulkhead to make room for the connector
 Courtesy of TESLA, INC. Courtesy of TESLA, INC.
|
 Courtesy of TESLA, INC. Courtesy of TESLA, INC.
|
- Disconnect the logic connector from the DCDC converter.
NOTE:
Tilt the front junction box away from the bulkhead to make room for the connector to be disconnected.
 Courtesy of TESLA, INC. Courtesy of TESLA, INC.
|
- Disconnect the battery heater connector from the FJB.
 Courtesy of TESLA, INC. Courtesy of TESLA, INC.
|
 Courtesy of TESLA, INC. Courtesy of TESLA, INC.
|
 Courtesy of TESLA, INC. Courtesy of TESLA, INC.
|
- Pass the DCDC logic connector, the electric battery heater connector, and the E-fuse ground cable up the bulkhead behind the front junction box towards the top of the bulkhead for harness removal.
 Courtesy of TESLA, INC. Courtesy of TESLA, INC.
|
 Courtesy of TESLA, INC. Courtesy of TESLA, INC.
|
- Lower the vehicle for access to the underhood area.
- Disconnect the LH shotgun accelerometer sensor connector.
 Courtesy of TESLA, INC. Courtesy of TESLA, INC.
|
- Disconnect the RH shotgun accelerometer sensor connector.
 Courtesy of TESLA, INC. Courtesy of TESLA, INC.
|
- Remove the underhood storage unit. See Underhood Storage Unit - Remove And Install
.
- Remove the underhood fuse box. See Fusebox - Underhood - 2nd Generation - Remove And Replace .
- Remove the bolt that attaches the front trunk harness ground at the left of the fuse box location.
- Disconnect the LH front ride height sensor connector.
 Courtesy of TESLA, INC. Courtesy of TESLA, INC.
|
- Release the clips that attach the portion of the front trunk harness that was previously disconnected from the LH front inner fender area.
 Courtesy of TESLA, INC. Courtesy of TESLA, INC.
|
- Release the harness clip at the LH front shock tower.
 Courtesy of TESLA, INC. Courtesy of TESLA, INC.
|
- Disconnect the coolant temperature sensor connector near the LH side of the bulkhead.
 Courtesy of TESLA, INC. Courtesy of TESLA, INC.
|
- Disconnect the PT coolant pump 1 connector.
 Courtesy of TESLA, INC. Courtesy of TESLA, INC.
|
- Disconnect the front drive unit logic connector.
 Courtesy of TESLA, INC. Courtesy of TESLA, INC.
|
- Remove and discard the nut that attaches the harness ground to the 12V negative battery terminal.
 Courtesy of TESLA, INC. Courtesy of TESLA, INC.
|
- Release the clip that attaches the 12V ground harness to the LH shock tower.
 Courtesy of TESLA, INC. Courtesy of TESLA, INC.
|
- Disconnect the high side A/C PT sensor connector.
 Courtesy of TESLA, INC. Courtesy of TESLA, INC.
|
- Remove the front trunk harness ground bolts (x3) and release the shotgun accelerometer harness clip from the front side of the LH shock tower.
 Courtesy of TESLA, INC. Courtesy of TESLA, INC.
|
- Disconnect the connector for the LH front wheel speed sensor.
 Courtesy of TESLA, INC. Courtesy of TESLA, INC.
|
- Disconnect the LH connector to damper harness.
 Courtesy of TESLA, INC. Courtesy of TESLA, INC.
|
- Disconnect the LH headlamp connector.
NOTE:
Take care when removing connector, as the release tab must be accessed from the front side of the connector under the outer casing.
 Courtesy of TESLA, INC. Courtesy of TESLA, INC.
|
- Disconnect the LH front harness connector of the front end module harness.
 Courtesy of TESLA, INC. Courtesy of TESLA, INC.
|
- Release the harness clips (x5) from the studs on the LH front body beam.
 Courtesy of TESLA, INC. Courtesy of TESLA, INC.
|
- Disconnect the battery coolant pump 2 connector.
 Courtesy of TESLA, INC. Courtesy of TESLA, INC.
|
- Release the connector of the front remote keyless entry antenna.
 Courtesy of TESLA, INC. Courtesy of TESLA, INC.
|
- Release the ABS module connector.
NOTE:
Depress the connector lever lock tab and rotate the connector lever upwards to release.
 Courtesy of TESLA, INC. Courtesy of TESLA, INC.
|
- Disconnect the battery chiller and EXV connector.
 Courtesy of TESLA, INC. Courtesy of TESLA, INC.
|
- Release the harness fir tree clip near the battery chiller.
 Courtesy of TESLA, INC. Courtesy of TESLA, INC.
|
- Disconnect the connector at the air suspension compressor.
 Courtesy of TESLA, INC. Courtesy of TESLA, INC.
|
- Release the harness clip at the middle of subframe, in front of the steering gear.
 Courtesy of TESLA, INC. Courtesy of TESLA, INC.
|
- Feed the left leg of the front trunk harness out up to the LH shock tower.
 Courtesy of TESLA, INC. Courtesy of TESLA, INC.
|
- Disconnect the coolant 4-way valve connector.
Courtesy of TESLA, INC.
|
 Courtesy of TESLA, INC. Courtesy of TESLA, INC.
|
- Release the harness clip from the 4 way-valve.
 Courtesy of TESLA, INC. Courtesy of TESLA, INC.
|
- Release the harness clips from the brake lines near the LH shock tower.
 Courtesy of TESLA, INC. Courtesy of TESLA, INC.
|
- Release the harness clips on the LH side under the shock tower cross member.
 Courtesy of TESLA, INC. Courtesy of TESLA, INC.
|
- Release the brackets (x3) that hold the brake lines in place near LH body beam
NOTE:
Only release the upper brake lines. Gently pry the bracket off of the brake lines and rotate the bracket 90 degrees to allow for more movement in the brake lines. This will allow more room for harness connections, mainly the ABS module connector, to pass through the opening between the brake lines and the body beam.
 Courtesy of TESLA, INC. Courtesy of TESLA, INC.
|
- Feed the harness out under the LH side of the shock tower cross member to the bulkhead, then up and over shock tower cross member.
 Courtesy of TESLA, INC. Courtesy of TESLA, INC.
|
- Remove the nuts (x3) that attach the harness carrier bracket to the bulkhead below the TXV.
 Courtesy of TESLA, INC. Courtesy of TESLA, INC.
|
 Courtesy of TESLA, INC. Courtesy of TESLA, INC.
|
- Disconnect the TXV connector.
 Courtesy of TESLA, INC. Courtesy of TESLA, INC.
|
- Remove the bolt that attaches the 12V cable cover to the E-fuse assembly, and then remove the cover.
NOTE:
Discard bolt after removal
 Courtesy of TESLA, INC. Courtesy of TESLA, INC.
|
 Courtesy of TESLA, INC. Courtesy of TESLA, INC.
|
- Remove the bolt that attaches the 12V power supply cable to the E-fuse assembly.
NOTE:
Discard the bolt after removal.
 Courtesy of TESLA, INC. Courtesy of TESLA, INC.
|
- Remove the nut that attaches the E-fuse assembly to the electrical battery heater bracket.
 Courtesy of TESLA, INC. Courtesy of TESLA, INC.
|
- Lift the bracket up to release the E-fuse from the tabs at the bottom.
 Courtesy of TESLA, INC. Courtesy of TESLA, INC.
|
 Courtesy of TESLA, INC. Courtesy of TESLA, INC.
|
- Remove the bolt that attaches the DCDC positive cable to the E-fuse assembly.
NOTE:
Discard the bolt after removal.
 Courtesy of TESLA, INC. Courtesy of TESLA, INC.
|
- Lift the E-fuse assembly up for access to the front cover.
NOTE:
Use caution with the front drive unit coolant hose.
 Courtesy of TESLA, INC. Courtesy of TESLA, INC.
|
- Remove the bolts (x3) that attach the E-fuse cover to thee E-fuse assembly.
NOTE:
Pay attention to bolt locations as 1 bolt is different from the others.
 Courtesy of TESLA, INC. Courtesy of TESLA, INC.
|
- Remove the bolts (x2) that attach the large cables to the bottom of the E-fuse assembly.
NOTE:
Note the location of the labeled wires during removal. Discard bolts after removal.
 Courtesy of TESLA, INC. Courtesy of TESLA, INC.
|
- Remove the screw that attaches the small cable to the bottom of the E-fuse assembly.
NOTE:
Note the location of the labeled wire during removal.
 Courtesy of TESLA, INC. Courtesy of TESLA, INC.
|
- Disconnect the logic connector from the E-fuse assembly.
 Courtesy of TESLA, INC. Courtesy of TESLA, INC.
|
- Release the cover from the RH side of the E-fuse assembly to expose the RH side fasteners.
NOTE:
Release the 2 tabs and slide the cover off.
 Courtesy of TESLA, INC. Courtesy of TESLA, INC.
|
- Remove the screws (x6) that attach the small cables to the side of the E-fuse assembly.
NOTE:
Note the location of the labeled wires during removal.
 Courtesy of TESLA, INC. Courtesy of TESLA, INC.
|
- Remove the bolt that attaches the ground cable to the E-fuse assembly.
NOTE:
Discard bolt after removal.
 Courtesy of TESLA, INC. Courtesy of TESLA, INC.
|
- Release the front trunk harness clip from the RH side of the bulkhead near the electromechanical brake booster.
 Courtesy of TESLA, INC. Courtesy of TESLA, INC.
|
- Release the edge clip at the brake master cylinder, and then disconnect the pedal sensor connector.
 Courtesy of TESLA, INC. Courtesy of TESLA, INC.
|
- Disconnect the logic connector from the electromechanical brake booster.
 Courtesy of TESLA, INC. Courtesy of TESLA, INC.
|
- Disconnect brake fluid level sensor and release the edge clip.
 Courtesy of TESLA, INC. Courtesy of TESLA, INC.
|
 Courtesy of TESLA, INC. Courtesy of TESLA, INC.
|
- Disconnect the RH front ride height sensor connector.
 Courtesy of TESLA, INC. Courtesy of TESLA, INC.
|
- Release the harness clip on the rear inner portion of the shock tower below the shock tower cross member.
NOTE:
1x clip
 Courtesy of TESLA, INC. Courtesy of TESLA, INC.
|
- Release the coolant hose clip at the RH shock tower.
NOTE:
This is done to make more room for harness removal.
 Courtesy of TESLA, INC. Courtesy of TESLA, INC.
|
- Release the harness clip under the shock tower cross member at the RH side of the body.
 Courtesy of TESLA, INC. Courtesy of TESLA, INC.
|
- Disconnect the RH connector to the damper harness.
 Courtesy of TESLA, INC. Courtesy of TESLA, INC.
|
- Remove the chassis ground bolt, shotgun accelerometer harness clip, and wheel speed sensor connector from the front side of the RH shock tower.
 Courtesy of TESLA, INC. Courtesy of TESLA, INC.
|
- Release the harness clips (x4) at the RH shock tower and body beam.
 Courtesy of TESLA, INC. Courtesy of TESLA, INC.
|
- Disconnect the steering gear connectors (x4).
NOTE:
Only release the front trunk harness connectors, It is not necessary to release the connectors between the steering rack and controller during front trunk harness replacement.
 Courtesy of TESLA, INC. Courtesy of TESLA, INC.
|
- Disconnect the RH headlamp connector.
NOTE:
Take care when removing connector, the release tab must be accessed from the front side of the connector under the outer casing.
Courtesy of TESLA, INC.
|
- Disconnect front fascia and front end module (FEM) connectors (x3) from the front trunk harness at the connector carrier on the RH body beam.
 Courtesy of TESLA, INC. Courtesy of TESLA, INC.
|
- Release the plastic nuts that attach the FEM and fascia connector carrier to the RH body beam.
 Courtesy of TESLA, INC. Courtesy of TESLA, INC.
|
- Disconnect the low side A/C PT sensor connector.
 Courtesy of TESLA, INC. Courtesy of TESLA, INC.
|
- Disconnect the air suspension valve block connector.
NOTE:
Take care when removing connector: the release tab must be accessed from the front side of the connector under the outer casing
 Courtesy of TESLA, INC. Courtesy of TESLA, INC.
|
 Courtesy of TESLA, INC. Courtesy of TESLA, INC.
|
 Courtesy of TESLA, INC. Courtesy of TESLA, INC.
|
- Remove the bolts (x4) that attach the 12V battery bracket to the shock tower cross member and the battery beam.
 Courtesy of TESLA, INC. Courtesy of TESLA, INC.
|
- Remove the 12V battery bracket with 12V battery from the vehicle.
NOTE:
The 12V positive cable to the E-fuse module remains connected to the battery.
 Courtesy of TESLA, INC. Courtesy of TESLA, INC.
|
- Remove the bolt that attaches the coolant hose to the battery beam.
 Courtesy of TESLA, INC. Courtesy of TESLA, INC.
|
- Remove the bolts (x4) that attach the coolant reservoir to the shock tower cross member.
NOTE:
This will allow room for the reservoir to move to make room during front trunk harness removal.
 Courtesy of TESLA, INC. Courtesy of TESLA, INC.
|
- Disconnect the coolant reservoir level sensor connector.
 Courtesy of TESLA, INC. Courtesy of TESLA, INC.
|
- Disconnect the A/C compressor logic connector.
 Courtesy of TESLA, INC. Courtesy of TESLA, INC.
|
- Release the edge clip for the A/C compressor logic connector.
 Courtesy of TESLA, INC. Courtesy of TESLA, INC.
|
- Remove the bolt that attaches the ground connection to the A/C compressor mount bracket.
 Courtesy of TESLA, INC. Courtesy of TESLA, INC.
|
- Remove the bolts (x2) and clips (x2) that attach the battery beam to LH and RH body beams.
 Courtesy of TESLA, INC. Courtesy of TESLA, INC.
|
- Remove the battery beam from the vehicle.
 Courtesy of TESLA, INC. Courtesy of TESLA, INC.
|
- Release the A/C line from the RH side of the A/C compressor.
NOTE:
Discard O-ring(s).
 Courtesy of TESLA, INC. Courtesy of TESLA, INC.
|
 Courtesy of TESLA, INC. Courtesy of TESLA, INC.
|
- Release the bolts (x2) that attach the A/C line below the RH side of the battery beam.
NOTE:
Discard O-ring(s).
 Courtesy of TESLA, INC. Courtesy of TESLA, INC.
|
 Courtesy of TESLA, INC. Courtesy of TESLA, INC.
|
- Release the A/C line bracket at the underside of the RH shock tower.
 Courtesy of TESLA, INC. Courtesy of TESLA, INC.
|
- Feed out the RH leg of the front trunk harness under the shock tower cross member and up towards the bulkhead.
NOTE:
If necessary, move the vehicle up and down on the lift to switch from working from above shock tower cross member, and through the opening in the RH fender well.
 Courtesy of TESLA, INC. Courtesy of TESLA, INC.
|
- Remove the front trunk harness.
NOTE:
This is a good time to compare the removed harness to the new harness provided to ensure parts received are compatible with the vehicle.
 Courtesy of TESLA, INC. Courtesy of TESLA, INC.
|